Year 11
Unit standard 2788 version 5
Achievement Standard 90032
Deadline: End of Week 3 Term 2
OverviewTawa College Counselling service would like a leaflet designed to alert
teenagers to the danagers of drinking excessive alcohol.
The counsellors feel it will appeal to teenagers if a modern, funky style is used, several images and quotes, data or stories from teenagers
Key Points* Create an a 3 fold booklet containing information about the dangers of alcohol.
* Use a wide variety of suitable information sources:
Section 1 - books, magazines, newspapers, pamphlets, internet, CDs, databases
Section 2 - survey, interview, questionnaire, email, cell phone texting, telephone query.
* Reword the original information to appeal to teenagers (2.1)
* Use images and other effects to appeal to teenagers (2.2/2.3)
Tasks
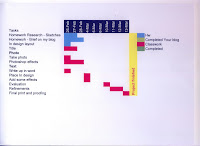
A. PlanningCreate a Gantt chart for the whole project. You will need to break your project up into tasks and work out how much time you will need to spend on each section and the order you will complete them. (1.1)
Sketch or stick examples of design inspirations into your Visual Diary
Write a brief on your blog. Your brief is a statement of use and should include the purpose and requirements of the documents. You should also plan for your use of resources e.g. information sources etc. (1.2/1.3)
Create thumbnail designs of your 3 Fold leaflet using blank pieces of A4 folded into 3. You should explore different layouts so shuld use several pieces of paper.
B. Acknowledge All Sources (90032)
Use your blog to keep track of all the sources you use. You can use one post and add to it each each lesson. Sufficient detail requires giving sufficient information for others to access the source, and generally will include:
• for a book source – author, title, date of publication and page number
• or a magazine or newspaper – name and date of publication
• for a website – full URL and date (updated and/or sourced)
• for email – the full email address and date of contact
• for a CD – title, year produced, name of article, search words if used
• for other sources – the relevant time/date/contact telephone number/email address – where appropriate
C. Creation of documentsYour documenets must be origional as far as possible (e.g. backgrounds) and any other images (e.g. from web) used should be referenced in your blog. (2.2)
Document demonstrates page layout and design principles (2.4)
Your work should look professional in its layout and the design and information should be appealing to the intended target market. (90032)
D. EvaluationProofing: Print out black and white copies of your documents and annotate them. You should be looking for; spellings, grammar, readability, layout and design. (3.2)Evaluate your designs against your brief: do your designs meet what you set out to achieve? What is good about it? Why? What could be improved? How? Were there any unexpected developments? Is the client happy with the result? (3.3)